Posts

#Look@Me Journal Page

Image
  Today I’m sharing my second page in my art journal, about me. I needed to make sure that I had a nice spot for journaling as I want to add an explanation about the book and why it’s all just pictures of me.  I thought it would be fun to try fussy cutting my image from the photo. I rarely do this but I’m so happy with how it turned out. You can see how this page came together in my process video below.  Thank you for stopping by and have an AMAZING day! Please use my discount code to save 10% on a min. $25 purchase https://ecraftdesigns.com/HEATHERSPAPERPLAYROOM CODE: HEATHERSPAPERPLAYROOM   

Hello - Art Journal Page

Image
 I’m happy to share a simple little Art Journal page with you today.  As I work through the pages in my journal I find that I have a few single pages to finish off. This was one of those pages and I was able to coordinate it nicely with its companion page.  You can watch a short video below showing how it came together.  Thank you for stopping by and have an AMAZING day! Please use my discount code to save 10% on a min. $25 purchase https://ecraftdesigns.com/HEATHERSPAPERPLAYROOM CODE: HEATHERSPAPERPLAYROOM 

Reflections on Me

Image
  I started a new journal to document how my looks have changed over the last 20ish years.  Over that time I would occasionally take a photo of myself. Most often it was to document a good hair day! I’ve never really used those photos in my scrapbooking, so I thought it be would fun to see how I’ve changed over the years. I used some older 49 & Market paper from my stash for the base page. I cut it using the Journal File XL1 page die from ECD. My picture is cut using the Labels, Tags & More set as well as the mat for the photo.  I stamped the background with CS343 Script from the Past and the other stamps are all from CS295 Journal Your Life (so fitting).  I am using the Square XL journal in Royal Blue and I embossed it using a folder from my stash. Then I rubbed some silver wax over it to highlight the details. I love the quatrefoil pattern since that is part of my brand imaging! I do plan to add some kind of title to the front of the journal, but that is a ...

ATC Prompt Easter

Image
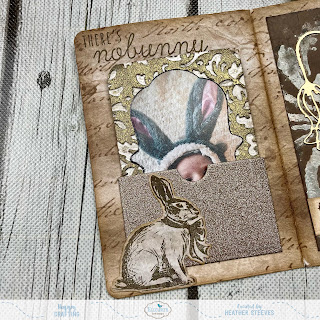
 Hi everyone, today I want to share another page in my Art Journal that includes an Artist Trading Card.  I finally had a chance to complete the April ATC prompt which is Easter. I thought it would fit nicely on this blank page in my journal.  I started with this scrap of embossed white cardstock. I put versamark ink on the raised part of the my embossing folder and after running it through the machine I added clear embossing powder and then heat set it.  Then I sprayed it with some Color Shine that’s been in my stash for a very long time!  This worked nicely and I just used a paper towel to blot off the colour on the embossing powder.  I grabbed some champagne coloured glitter paper and cut out a pocket using the Artist Trading Coin die set.  I cut out an adorable picture of my newest grandson using the Elizabeth Craft Designs ATC Special Kit die. This die is meant for the label on the back of your cards but works great for other things too! I in...

Sidekick Saturday February 17 Prompt

Image
The theme for Sidekick Saturday on Feb 17 was LOVE. Yes, that was almost two months ago! I’m still trying to catch up on these prompts. Also note that I’m using my full size planner instead of the Sidekick.  I’ve had this little paper cup sitting on my desk for a while as I really like the watercolour hearts. I knew it would be a good inspiration for a project.  Instead of actually trying to draw the hearts with a brush and watercolours I just WATERCOLOUR STAMPED them!  Have you ever tried this technique?  It’s really easy and the results look just like you painted them! I wanted to insure that my page would coordinate nicely in my planner, so I chose a piece of paper from the new Petal Pink pack. It ties in perfectly with my previous page! You can see how that page came together here .  I added some dark pink & black cardstock from my stash and used some Abandoned Papers on the pockets.  You can see the full process video on my YouTube channel.  I...

Quick Planner Page

Image
Hi there! Today I want to share a simple Journal Page. I had some left over pieces from a previous planner page and decided to quickly decorate a blank page in my Art Journal.  I inked all of the edges with some brown ink to distress/age them a little. I used a glitter brush over the black mesh to add some shimmer, unfortunately it doesn’t show well in the picture.  Very simple but cute and it matches so well with its companion page.  Please watch my process video below to see all of the details and what products I used.  Thanks so much for stopping by and have an AMAZING day!

Journal Together 2024 April Prompt - Emboss Resist

Image
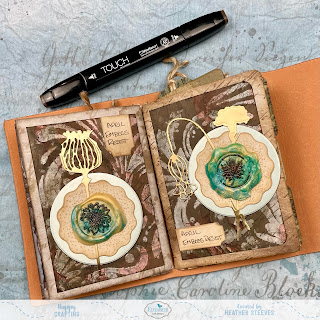
Hi there, today I’m sharing the journal pages that I made during a Facebook Live on the Elizabeth Crafts Facebook page.  I started by stenciling some VersaMark onto paper from the Abandoned Papers pack. Then I heat embossed with clear embossing powder. Next I rubbed a dark brown ink over top of the entire paper.  I cut out the decorative pieces using the Artist Trading Coin, Border Flower, Floral Inserts, Budding Florals and the Art Journal specials dies.  I stamped the wavy circles with the Artist Trading Coin stamps and inked distressed all of the edges with brown ink.  I used my mini pancake maker to melt the wax beads and create the seals. You should definitely check out the video if you’re interested in how that works. I forgot to highlight the seals during my video but did it after using a dark brown alcohol marker.  Thank you for stopping by. Be sure to watch the video on the  Elizabeth Crafts Facebook page All of the ECD products I used in this proj...