Posts

Showing posts with the label technique

Playing with Guilding Wax

Image
  I had some fun experimenting with Guilding Wax for the Journal Together October monthly prompt last year. I used  the Journal Romance Special kit from Elizabeth Craft Designs for this project. I started by cutting the nesting rectangles from the Coffee Dyed  papers   & some brown cardstock. I rubbed some guilding wax around the edges with my fingers. I cut the lock and key out of bazzil cardstock so I could use the textured side to see how the guilding wax would look on it. I rubbed the guilding wax over the entire front of the die cuts.  I love how it turned out! It gives such a neat texture. I also rubbed some guilding wax onto a piece of white cardstock to create a matching paper! I cut out two of the pocket pieces and used the matching die to create the openings.  Again, I used my guilding wax on the edges and around the openings.  I used the guilding wax paper behind the openings in the pockets.   I decided to also cut out a flower and ...

Remember Moments Art Journal

Image
  I have  another page in my Race Day Art Journal to share with you.  This time I added some bright green to mix with the browns   I used some opaque texture paste mixed with some acrylic colour and applied it through a stencil for a fun background texture.  I cut out my photos and mats using the Page Filler dies. Those dies are so fun for creating shaped photos! I added splattered gloss spray in the same colour as my cardstock die cuts. I also stamped some sentiments and die cut them out.  You can see all the details in the short process video below.  I used the following Elizabeth Craft Designs products which can be found in your local craft store or in the ECD website.  2163 Journal Sleeves Fillers 1 2159 Remember Journal Stencils 4 CS365 Travel Phrases Coffee Dyed Paper Thanks for stopping by and have yourself a wonderful day.  

ATC Prompt Circles

Image
  Hi again. Today I’m sharing my ATC’s for the Elizabeth Craft Designs July ATC prompt. The prompt this month is “circles”. I started out by cutting the cards from the Abandoned Papers collection using the stitched ATC die from the original ATC Specials Kit.  My next step was to run them through a couple of embossing folders I had in my stash. Each one has a different circle pattern.  Next, I used my brayer to apply some die ink to the embossed circles.  Once the embossed circles were coloured I used the same ink to edge distress each card.  I used the same ATC Specials kit to cut out bases for my cards using brown cardstock that coordinates nicely with my patterned paper.  I ink distressed the edges of the bases with my light brown ink and stamped the back with the coordinating stamp from the ATC Specials kit.  I attached the cards to the bases.  I pulled out the hot air balloon stamp from set CS361 Around the World. First I mounted it to my bloc...

Sidekick Saturday February 17 Prompt

Image
The theme for Sidekick Saturday on Feb 17 was LOVE. Yes, that was almost two months ago! I’m still trying to catch up on these prompts. Also note that I’m using my full size planner instead of the Sidekick.  I’ve had this little paper cup sitting on my desk for a while as I really like the watercolour hearts. I knew it would be a good inspiration for a project.  Instead of actually trying to draw the hearts with a brush and watercolours I just WATERCOLOUR STAMPED them!  Have you ever tried this technique?  It’s really easy and the results look just like you painted them! I wanted to insure that my page would coordinate nicely in my planner, so I chose a piece of paper from the new Petal Pink pack. It ties in perfectly with my previous page! You can see how that page came together here .  I added some dark pink & black cardstock from my stash and used some Abandoned Papers on the pockets.  You can see the full process video on my YouTube channel.  I...

*NEW RELEASE* Art Journal Elements

Image
Today is the DAY! The new collection from Devid Roodenburg is here. I’m so excited to share my first project using this new release! Since the Artist Trading Coins are new to this collection I thought that would be a fun place to start.  Instead of making individual coins I thought it would be fun to make  a chain of coins!  I also created a little storage box for them. Each coin is double sided I used the new ECD Art Journal Elements Artist Trading Coins stamp and die sets. You can see all of the details in my process video below. Thank you for stopping by and have an AMAZING day! Please use my discount code to save 10% on a min. $25 purchase https://ecraftdesigns.com/HEATHERSPAPERPLAYROOM CODE: HEATHERSPAPERPLAYROOM

Huntington Halloween

Image
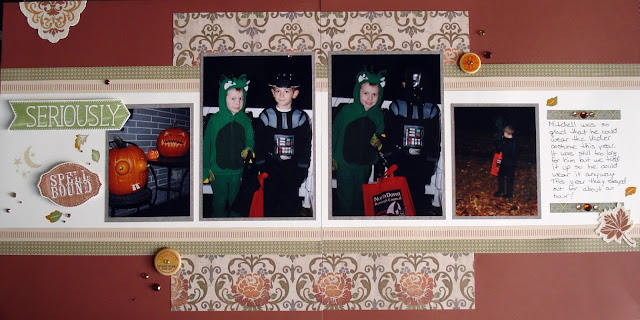
I've been getting caught up on my Halloween layouts.  This is a retired paper but it suited the subject. This is the workshop layout but I changed the title to suit my needs.   I've used the swiping technique to stamp my title images.  So simple but a great effect.

Hopscotch Layout Inspired by Pinterest

Image
I always start my scrapbooking layouts by reviewing my pictures and finding a pattern that suits them before even printing them.  Sometimes that means using a CTMH pattern and sometimes it means using a pattern I find on the internet.  I always start with something as my inspiration though, even if in the end it looks very different.  This layout was inspired by one I saved on my Pinterest board . The original post can be found here . Since I usually create double page layouts and this was just a single page, I needed to figure out how to the right page would look.  It was pretty simple though and I think it turned out quite well.   I used the new Hopscotch Workshop kit and the coordinating complements .  This kit is only available until the end of March in the first Seasonal Expressions Idea Book.  The frame is a photo mat cut from the Cricut Artbooking cartridge.  I used the arrows that were cut out and just flipped them over...